4.16.2014

Project Post: Easy Canvas Applique Art

Here's a quick and easy one.

So awhile back I needed three small canvases for a project I was doing for a baby shower. For something that seems like such a simple object, canvases can be pricey! So when I found a Bargain Pack of 10 at JoAnn's and I had a 50% off coupon, I figured I'd find something to do with the other 7. I think including this project I still have 3 to go.

Anyways, you could adapt this a million different ways, but in my case I had been hoarding two applique numbers. Backstory: the Padres hold a "Garage Sale" for charity before the start of every season. They pull tons of stuff from out of storage and you never know what you'll find --- game-used jerseys, autographed balls, surplus promotional items, old banners used on the streetlamps surrounding the ballpark, batting helmets, uniform pants... it's crazy. Season ticket holders get priority entrance and line up around the block at like 7am hoping to get their hands on cool memorabilia. But if you volunteer at the Garage Sale (and get the coveted set-up shift), you can claim first dibs.

Last year I found a box of assorted letters and numbers, the kind that are sewn onto the backs of jerseys. I was hoping to find numbers to spell out our full anniversary (12.27.08), but only wanted the retro brown numbers, so I could only find "27." Good enough. As it turned out, the 27 fit on my canvas perfectly.


I had some khaki twill-ish fabric on hand from a previous project, so after ironing it I laid my canvas in the center and cut out a square with a couple of extra inches on each side. From there I basically followed the guidelines of how the canvas was already wrapped, and like wrapping a present, I worked on one side at a time and stapled the edges and corners.

You'll need to work on the corners so that they stay snug and relatively flat. Also, I decided to tuck in the little bit of excess I had on a couple of the sides and add a few extra staples.

Once I had my canvas ready, I considered using my glue gun to adhere the numbers, but since I had this no-sew fabric glue on hand I thought I'd give that a try and hope for fewer glue-strings. The directions basically just tell you to add the glue to both pieces of fabric that you're sticking together -- but since I was sure I would get glue on parts of the canvas I didn't want to get glue on, I stuck to putting glue on the perimeter of my numbers, carefully laying them on my canvas, and then before they had time to bond I carefully lifted the edges of the numbers and added a thin line of glue to the canvas as well. 


I did one number at a time, and while it dried/bonded I laid a heavy book on top. Oh, I also recommend using something flat that fits within the frame of the canvas to give you a better working surface -- I used my 9-inch square cake pan. Then when you lay the book on top it's really pressing the two fabrics together firmly from both sides. Repeat with second number (or letter or applique shape or whatever you're using).

Overall, even though I can see that I don't have the spacing quite right, I'm pretty happy with how this turned out! In fact when E saw it laying on the table after I'd finished it he said he thought I had a Padres jersey folded up just showing the numbers. That's fun, right? If you don't have access to MLB-surplus items, you can usually find jersey numbers and/or letters at sporting goods stores, embroidery shops or sometimes screenprinters, even craft stores and trophy shops. Doing a name, jersey-style, or a birthday could be really cute for a kid's room. It's an easy way yo make something one-of-a-kind and totally personal.


So this is eventually going to be part of a gallery wall in our bedroom -- we've lived here more than four years and I've never really put any art on our bedroom walls. It's sad. But not for much longer! #AnotherUnfinishedProject In the meantime I had fun staging it with some other Padres stuff (and retro Padres-colored flowers).

So what kind of quick and easy art projects are you doing lately? Anything using these cute little 10-inch canvases? I think I bought a pack of 10 for about $20, and my garage sale numbers were like, $1 each so that makes this a pretty frugal art piece. :)

Happy canvassing,

4.11.2014

Pinspired: Bunny Bark

I'd been eyeing those "Bunny Bark" or "Bunny Bait" recipes... stuff like this. Pretty straightforward, if you've melted white and dark chocolate to make Peppermint Bark, you can surely do this.

The recipe I more-or-less used can be found here, from Your Homebased Mom. I'm sure that her finished product, if I followed it to the letter, is fantastic--I mean it looks good enough to eat right off my screen--but I just don't often follow recipes to the letter!

I kind of took note of the ingredients then winged it based on what caught my eye at the store. I know most of the recipes use those Golden Oreos to keep everything nice and pastel-colored, but... Double Stuf Oreos are better, #AmIRight?  I also grabbed a couple of small boxes of chocolate-dipped peanuts, but I think almonds would be amazing, and I just used several snack-sized bags of pretzels since that happened to be a better deal than one larger bag. If you can't find the white Almond Bark you could use those candy melts from Michael's or JoAnn's. I pulled out the food coloring but didn't think I needed it... Really you could make this completely loaded with candy and sweets or keep it simple, it's entirely up to you!

To try to keep things on the cleaner side I lined my cookie sheet in aluminum foil first, and you might want to give it a spritz of non-stick spray just to make your life easier.

I started by breaking up and laying down my pretzel pieces and Oreo chunks, as well as the chocolate-dipped peanuts. This helped keep the color of the finished bark more pastel-ish instead of being really muddled by Oreo dust. I reserved a handful of each to add to the top of the finished bark.

Just be careful to melt your chocolate in small increments (time-wise, like just 15 seconds or so at a time once it starts to get soft) to avoid burning it!

Using smaller increments again, I spread it over my cookie-pretzel layer on my baking sheet, followed by a sprinkling of pastel M&Ms and crystal-y sprinkles while the chocolate was still nice and soft. I just did one manageable section at a time.

After working my way across the baking sheet with a layer of white chocolate, I used my reserved pretzel-peanut-Oreos and smushed them into the still-soft chocolate so that the top gave a hint of what was covered by chocolate at the bottom. Then it's just a matter of staying away from it long enough to let it harden!

Then break that ish up. I've made Peppermint Bark that basically shatters when you look at it because the layers come out so delicate, but this bark has a bit more bite, I guess you could say, and I had to pretty much slice it into squares in some cases where the chocolate-cookie-pretzel goodness was really thick.

I think the best thing, other than it's packed with so many yummy and not-good-for you things, is the sweet-and-salty mix you get by adding the pretzels. I will caution that it came out super-rich...definitely plan on giving most of this away or bringing it to a party because your tummy will not appreciate you binging on this!

Again, this is super-easy, doesn't take much time, and could easily be a fun project for kiddos to participate in with you. Throw a few pieces into a cute bag or basket with a bow and it's perfect for neighbors, teachers or friends. 

Enjoy!!! 


4.01.2014

April Powers

Baseball is back. Grass is green. Papa's birthday is this week and my Dad's is later this month. I start a new job and hopefully bright things are ahead. Feeling positive and grateful for people and opportunities. 

I think ole' Bill Shakespeare said it best --- 


Xoxox, 


3.24.2014

Project Post: A Springtime Peacetime Wreath

Happy Spring! I guess it's officially spring but we've had such remarkably nice weather (even for here) all winter that I'm already feeling summery. Except that I still have pretty pasty legs.

So I had been wanting to make a peace sign wreath. I wanted it to be rustic and flowery and... peaceful.

There are a million ways you could make one, I'm sure. But here's what I did (and this is, I promise you, something any crafter or non-crafter could do):

Start with a cardboard base. I used the shoe box my husband's work boots came in (a pizza box would probably work well). Traced a circle, cut it out, wrapped tape around it to help stabilize it, painted it a few shades of green. Pretty elementary school-level crafting so far.
Then I added moss, which is probably the messiest part. Be prepared for that. For this project I used moss that comes on a roll held together with really thin wire (something like this); it comes pretty packed together so I had to stretch and arrange it a bit to "fluff" it. It was my biggest expense for this project and I think it was under $4, regular price. You could use a pack of loose moss as well but you'll probably need a lot more glue and time since basically every piece will need to be glued to your base as opposed to this moss ribbon which can be held on with a chunk of glue spaced around the wreath, does that make sense?

Next add layers of tree bark, I just broke mine off in small pieces. I also flipped the wreath over and added bark from the back of my base so that from the front it had a more three-dimensional look.
Not very pretty from the back, but who's looking?
I started layering on a ton of small and medium sticks I'd collected. Start with the big ones around the perimeter and to make the "structure" if you will, and then keep filling in with smaller ones. My trusty mini-glue gun was more than adequate for this. So far, still easy-peasy.

Almost done ---  I wrapped some jute twine around the whole thing to help keep everything in order, though really it's all that glue-gunning doing the work. I added the twine to the back to hang it from a hook or nail, too. Ok, and literally I almost forgot to tell you to add branches to the center to make it a peace sign. duh. This is pretty straightforward, the most difficult part was finding three sticks that created the shape I wanted and fit together, so just keep trying until it looks right. You might want to reserve a few of your longer, thicker, branch-ier sticks for this part so that you have more to work with, and you can always break them up to be shorter. Even though they're primarily held together by glue, I added more twine where they meet to keep that handmade look.  
You can see better here that the whole thing has a really layered, rustic look. It's imperfect.
I wanted it to have the feeling of something Maid Marian would have just
thrown together on a springtime afternoon in Sherwood Forest, #HowsThatForAVisual? 

Finally, add the finer details. I pulled individual buds and sprigs off of a few large stems from Dollar Tree and JoAnn's, just filling them in by working my way around the wreath. This may be the hardest step and it is still easy.

And that's it!

I have had this on our front door for about two months now and it has held up perfectly well. Granted we've had just one spring storm during that time, but you know, it experienced wind and rain. :) This was also a really inexpensive project; when you consider I used recycled cardboard, found sticks and bark, and already had the twine, glue gun and glue sticks on hand. If you needed to purchase supplies, I'd suggest searching for a Michael's or JoAnn's coupon to save a bit on the glue gun (the mini-size is usually under $5, I think), and I usually find glue sticks at the 99-cent or dollar store. I happened to find my flowers there as well although again, Michael's usually has a huge selection that go on sale, and you don't need many. I'm confident that you could make this wreath for under $15 or so.


So there's my Springtime Peacetime Wreath! What are you crafting to welcome Spring and/or get ready for Summer? Anyone working on some kind of wreath, or maybe fun Easter crafts? I feel like this is something you could use through the Easter season without it having eggs and bunnies on it --- I mean wasn't Jesus' mission to bring salvation and peace? :) Is everyone ready for Spring weather? I'm loving the 80-degrees days we've had off-and-on, can't lie :)

Happy Spring and Peace Be With You,

3.21.2014

Easy Riders.

So E and I had been talking a lot about how nice it would be to take up bike riding. Not in a Lance Armstrong-way, just something that would be great to do on all the beautiful-weather days we have around here.

We figured the pros were:
  1. It's healthy.
  2. Once you get past the initial cost, it's relatively cheap (we have tons of bike paths near the beach and a really nice one at the lake literally  next door to our house).
  3. It would be nice to start something as a couple that we can continue to enjoy later on as a family (I'm already picturing how cute he would be with a baby seat on the back or towing one of those kids' trailers).
There's probably others.

Anyways, since I had a few-years old beach cruiser still at my mom and dad's house (they upgraded my basket as a surprise and my brother so nicely gave it a tune-up-----THANK YOU!!!), I had decided I wanted to get him one for his birthday. After making sure we could afford it, I dropped a million hints when we saw cool bikes like "Hey, look at that cool one with the blue wheels." Honestly for as smart as he is he just does not pick up on little things like that, otherwise I'd have been worried he knew what was coming. :)

So I had a pretty good idea of what he'd want -- sleek and sporty -- and what we could manage, cost and maintenance-wise. As much as I try not to shop at WalMart because, stick it to the man, I ended up there looking at exactly what I had in mind. It was slightly on sale at the time so it was right in the range of what I wanted to spend and it had overall great reviews dating back a couple years (I read them all). From what I read from previous customers, it wasn't going to win you the Tour de France or do a good job of going up and down mountains, but was good for rides around the neighborhood or boardwalk -- perfect. They also said it was easy to assemble and to customize with various parts, if you so desired. And so with E still working during the week in LA for another couple weeks so I knew I could make it a surprise, I hit "order" and eagerly awaited the free warehouse-to-store pickup delivery.

When I went to pick it up, oh man. The box barely fit in the shopping cart. And because I was driving the old Corolla, I wasn't sure I'd get it home, either. But love conquers all and I wedged it into the backseat. :)

Also, I carried it down the block into our living room. It wasn't that it was excessively heavy, just that I couldn't get my arms all the way around it (for reference, see below). Should've planned better but that's how I live.

It came partially assembled, thank goodness, and I'm proud to say that I put the rest of it together myself. #IDidIt  Most of my assembly experience comes from Ikea furniture so this was a lesson in following directions written in actual words and not with little stick figure suggestions. Oh yeah, I dropped it on myself at one point and my entire leg was bruised but since I have a tendency to walk into furniture, doorways, etc. he didn't think this was weird, either.

before...
after!!!
Then I had to hide it. Even though E was gone during the week he was still home Friday night - Sunday afternoon and it was two weeks before his birthday. Amazingly, I got it into our closet. We have one of those shallow closets with sliding doors that runs the length of the wall and it is STUFFED because it's basically the only closet we have (#FirstWorldProblems), so I had to move the rolls of wrapping paper and our suitcase... and again, my darling thought nothing of the extra clutter in our room (and never opened that side of the closet since it mostly contains lesser-used things like winter coats, dressy clothes, and the aforementioned wrapping paper and suitcase.

The morning of his birthday he ran to the store for milk (thanks, babe!) and I quickly wrangled the bike back out so that it was right in front of the door when he walked back in. And he was surprised! It was so fun. I got a "WTF" out of him. He had nooooo idea that a bike had been hiding behind his khakis and a shoe rack.

How cute is he?
Also is that a shadow or giant stain on the side of the couch? :|
And so we ride! We've been to Mission Bay a few times now (the aforementioned miles of nice bike paths) and I've been riding around the lake quite a bit. And with summer coming I look forward to really taking advantage of being able to explore the beaches, neighborhoods, and other trails. The thing we're still trying to figure out is where to store them---I'd like to keep them covered on our patio but I've also looked at those cool wall-mounted racks. Any suggestions for keeping two bikes in a small-ish apartment?

What about you? Any avid cyclists or just weekend warriors? Anyone making a bike purchase any time soon? I can say that E really likes his, we did change out the seat to a wider, cruiser-style one because the original was waaay to narrow to be comfortable for anyone who has a butt, of any kind.

Happy Trails!

2.27.2014

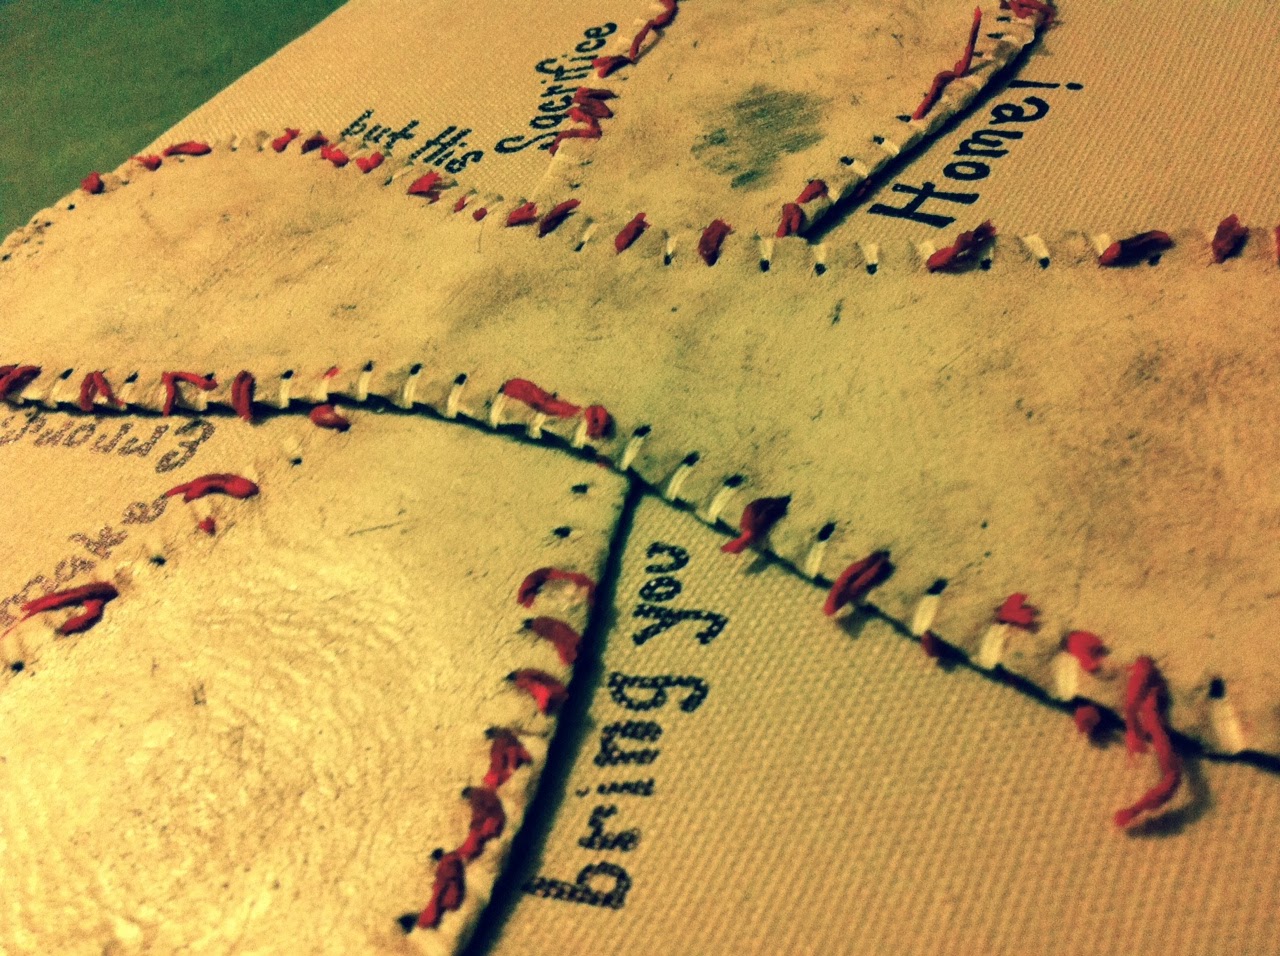
Project Post: God Gave Us Baseball - Baptism Gift

Everyone I know is having babies.

This means that many baby gifts are necessary, and (at least in my "circle" of many Catholic School Alumni friends) many Baptism gifts. I feel like a Baptism gift should be something that reflects the occasion and entrance of an individual into the Church and a life of faith, right?  I mean, I personally prefer to give something religious-related as opposed to like, toys or baby supplies or something -- for both my Goddaughters I've given Bibles (a very traditional heirloom version in one case and a bilingual baby version in another), and a few years ago I made a baby sweatshirt using a religious iron-on accented with fabric paints (I'll have to try to find the pictures on an old hard drive).

Anyways.

I had pinned the inspiration for this project (I believe the original is still available on Etsy) quite awhile ago and was looking forward to the right opportunity to make something similar. The opportunity came via our friends we met through a softball team a few years ago, and their precious little chunk of a firstborn, Matththew.


I thought this would be a great, personal gift for them -- they're both total sports freaks (we even ran into them at a Padres game a few weeks before their due date and they joked that they'd name the baby something like Tony Trevor Winfield Randy Garvey if labor started at the game #PadresFansJokes).

As luck would have it, I had a super-banged up softball in the trunk of my car, otherwise you'd have to pick one up -- I supposed you could check garage sales or thrift shops if you wanted a vintage-y looking one, or purchase new if you wanted something crisp and white. FYI - the softball, once opened up, fit almost edge-to-edge on my 10" square canvas... a baseball would be a bit smaller (I think my Pinspiration was done in an 8" shadow box) and you could go even a little smaller with a Little League baseball or search for some type of small souvenier ball of some kind).

 
Since I was going for the well-worn, vintage-y look, I didn't take much care in in disassembling it -- just scissors (a seam ripper would probably be even easier) to cut the stitching and I left the edges more or less ragged. You could do a much neater job if that's your jam.


Here's the thing -- despite being worn, the leather came off rock hard. Like, it stood up still rounded. Not sure if it would work (and also wanting to clean up something intended for a baby's room), I soaked it overnight in a bucket of water with a little vinegar and dish soap. This made it easier to work with, but I still needed it to lay flat. I laid it between two towels and then put a really heavy box on top of it overnight.  Note: you'd have more options if you're using a frame or shadow box -- for example, you could use straight pins to anchor it to the back of a box, or pull out the red stitching altogether and then re-sew it onto a fabric for the back of your frame or box.

The canvas was an easy prep -- just a couple coats of paint in a light beige. I also used my homemade ModPodge-y solution (half-and-half Elmer's glue and water) on the canvas and ball, seperately. So basically I coated the painted canvas and the two pieces of the softball. My goal was to seal each element, especially the loose ends of the red threads.


Here's where I overestimated the power of my glue gun (which doesn't happen often!). I tried gluing the softball to the canvas and the glue just peeled right off when dry. Sh*t (of course I'm working on this the night before it needs to be finished).

Ok... I run to Michael's about an hour before they close, thinking I'll pick up a shadow box frame and try attaching the softball with straight pins. Of course there's a too-small shadow box and a way-too-big and pricey shadow box.  I check out the Special Glue aisle. Among the wood glue, super glue, etc. was some variation of super glue that promised to work on wood, canvas, leather, fabric, metal, etc. A tiny bottle ran somewhere between $3-$4 (of course I brought the wrong coupon).


Hallelujah, it worked (at least it was bonded when I wrapped it the next morning and I haven't heard that it's fallen apart at all). Following the instructions on the glue bottle, I just went slow and inch-by-inch to put a bit of glue on both the canvas and softball before holding them together to bond. I wish I'd had a second bottle for back-up -- don't know what I was thinking -- because my one bottle just barely finished the job.

 
I used the Pinspired quote and added Matthew's name and Baptism date. I hope it's something that he can keep for awhile -- I can't imagine this kid NOT being a baseball fan. This would make a sweet gift for the Little League-r, coach or fan in your life. In fact I might have to make one for myself!

 
So Happy Spring Training! What are you looking forward to this baseball season? I feel like this is going to be a bittersweet time for Padres fans, since it is about to really sink in that we won't be hearing The Colonel call any more games with his gracious charm, wit and wisdom.  Also, what are some other ideas for Baptism/Christening gifts? Anything really cool and creative? Do you go with something very traditional? Something to be used as a baby/kid or something to last for a lifetime? I'm sure more babies are on the way so I can always use the ideas!!


May your feet be swift, bats mighty, and balls be... plentiful,

2.18.2014

Project Post: A Card for the Travelers' Next Adventure

So I guess you could say card-making is kind of my thing. I mean, I more often than not make cards instead of buying them (although I do love when you find a really beautiful, funny or otherwise perfect card in the store), and several people have told me that they've kept all the cards I've ever made them or their kids.

That's sweet. Means a lot. Makes me want to keep doing it. :)

What I like about making a card is that it can be extremely personal -- you can't always find that in a store. I love finding a quote or theme or sentiment that's just perfect for the person and occasion.

We've got a few friends that are extremely well-traveled. Like, more than I will ever be. I really admire the sense of adventure and the way they say "yes" to new people, places and experiences.

When one of those couples got engaged, and the other was about to have their first child, I knew that would be a great theme for some congratulatory/best wishes cards. I guess you could say I cheated a bit by making these almost the same, but even though the words of the message are nearly identical, I felt that it fits each of them in their current, exciting stages of life.


A "Best Wishes for Baby" Card for the First Class World Travelers
I wanted to emphasize planes on this one since Dad is in the flight industry (that's as much as I could tell you to describe his job, I think it is something in logistics...?). I used softer, baby-friendly colors that I thought were still bright and cheery and chose stripes and plaids that I thought were appropriate for a little gentleman on the way (I thought the "All Packed and Ready to Go" sticker was appropriate for first-time Mom who had her hospital bag ready for probably about five months). 

 
Oh yeah, and the G'14 is for their last name and the baby's birth year!
 
 
A "Best Wishes on Your Engagement!" Card for the Adventuresome Duo
Again, basically the same concept applies here, but I played around with bolder colors -- in this case, lime green and navy blue for their Seattle Seahawks of their adopted hometown (I sent this right in the middle of the NFL playoffs).


In both cases my writing is freehand with fine point Sharpies (with the exception of the stamps I used on the first card), but a good handwriting font would be nice if you're not ready to wing it by hand. The cardstock is available at Michael's or JoAnn's, as well as any travel-themed stickers or accessories you might want to add. Here's my trick for the sketching the planes and suitcases, though (I'm not an artist by any means) --- once I find an idea of what I'm looking for on Google Image or somewhere, I hold up a sheet of plain paper over the screen, and really lightly trace it, going back and forth to take a look at the original compared to my copy... I then outline it in dark marker so that I can trace that onto my decorative paper. Your other option might be to print out a picture you like and accent it with colored pencils or markers.

In an effort to be a disclaimer; I don't know that I would sell a card using someone else's illustration... but I'm not a lawyer, soo..?

Anyways, there's a couple ways you can wish the travelers in your life the "Adventure of a Lifetime" for their momentous occasions. What kind of life events are coming up in your world? And what's on your travel bucket list? If I haaaaaad to narrow it down, mine is pretty much everywhere in Mexico, Fiji, and Alaska.

Happy Trails (and card-making!),